Plastic Sheeting Blog. Click on Home for all our product categories...

Global Plastic Sheeting

Recent Posts

Enkadain's Trusted Drainage Solutions for Over 25 Years

Posted by Global Plastic Sheeting on Wed, Dec 27, 2023 @ 10:41

Enkadain Excellence: Addressing Common Construction Challenges with Innovative Solutions

In the dynamic realm of construction, architects and engineers rely on Enkadain for its proven reliability and adaptability. Here's how Enkadain excels in common construction challenges:

1. Flexibility and Cost Efficiency

  • Over 25 years of global trust, Enkadain products are highly flexible, conforming to diverse surface shapes.
  • Predictable flow rates, longer rolls, and reduced installation costs make them cost-effective.

2. Environmental Stewardship

  • Enkadrain 3000R Series, a new generation, is crafted from post-industrial recycled polypropylene.
  • Contributes to LEED points, aligning with sustainable practices in construction.

3. Advanced Drainage Solutions

  • Enkadrain offers three-dimensional, multilayer drainage products, providing hydrostatic pressure relief.
  • Lightweight alternative to traditional drains, designed for diverse applications.

4. Tailored Products for Varied Needs

  • Enkadain provides a range of products catering to specific applications, from small landscaping to heavy-duty industrial sites.
  • Drain flow variations ensure suitability for different soil types and backfill depths.

5. Enkadrain Family of Drainage Products

  • A lineage with a 25-year legacy, continuously adapting to the changing construction landscape.
  • Diverse products like Enkadrain 3000, 3601, 3801, 3511R, 3615, and 3811 tailored for specific requirements.

6. Innovative Applications and Contributions to LEED

  • Enkadrain products contribute to LEED points, showcasing a commitment to green building practices.
  • Applications span foundations, retaining walls, commercial buildings, planters, plaza decks, slabs, parking, lagging walls, and more.

7. Hydrostatic Pressure Relief and Filtration Excellence

  • Enkadrain excels in hydrostatic pressure relief, with models like Enkadrain 3615 designed for high load-bearing capacity.
  • Filtration efficiency in models like Enkadrain 3511R suits applications like green roofs and landfill drainage.

8. Common Questions and Solutions

  • Q: For roofs with ponding water causing plant distress, which Enkadrain to use?

    • A: Enkadrain 9118, Enkadrain 9120, and Enkadrain 9125 will lift plants above ponding water.
  • Q: Roof has sufficient fall to the drain, but drainage to convey runoff is needed. Recommendations?

    • A: Enkadrain 9010, 3611, 3615, 3811, or EnkaRetain&Drain 3111, 3211 for high water storage.
  • Q: Roof runoff too quick on steep slope, causing substrate dryness. What to use?

    • A: Enkadrain 3601, 3801, or 7910 to slow runoff. EnkaRetain&Drain 3111, 3211 for water retention.
  • Q: Exceedingly steep gradient causing high runoff and material sliding risk. Solution?

    • A: Enkadrain 3601, 3801, or 7910.

In essence, Enkadain is more than a product; it's a legacy of innovation and adaptability, shaping the very foundations of construction excellence. Architects and engineers, join the legacy, and elevate your projects with the trusted solutions that Enkadain has been delivering for over a quarter of a century.


Click for
pricing/ info

Resource page for Plastic Sheeting, Greenhouse Plastic, Fire Retardant Products, HDPE- LLDPE, Tapes  760 597 9298 Global plastic sheeting


Tags: #EnkadainInnovation, #SustainableConstruction, #DrainageSolutions

EnviroGrid® Geocell: Revolutionizing Infrastructure Through Advanced Soil Stabilization"

Posted by Global Plastic Sheeting on Fri, Dec 22, 2023 @ 03:23

EnviroGrid® Geocell: Pioneering Soil Stabilization for Sustainable Construction

ENVIROGRID® GEOCELL- SOIL STABILIZATION & LOAD SUPPORT

In the dynamic landscape of construction and industrial projects, soft subgrades often pose significant challenges. Enter EnviroGrid®, a groundbreaking geocell solution reshaping the way roads and foundations are built in even the most demanding terrains.

The Need for Stability: Soft Soils, Unstable Subgrades, Marshy Landscapes

Soft soils, marshy landscapes, and unstable subgrades have traditionally hindered construction projects. The need for a reliable solution led to the development of EnviroGrid® Geocell. This innovative three-dimensional system functions as a stabilizing force, allowing for the construction of roads and foundations in areas once deemed impractical.

EnviroGrid® Unveiled: A Structural Marvel

EnviroGrid® Geocell stands out for its honeycomb-like structure that encapsulates and fortifies infill material. This ingenious design provides a stable platform, preventing the settling of roads and foundations. The geocell's flexibility accommodates various terrains, ensuring adaptability to the unique challenges posed by each project.

Industries Benefiting from EnviroGrid®: A Versatile Solution

  1. Infrastructure Development: EnviroGrid® is a game-changer for road construction, enabling projects in areas with traditionally challenging subgrades.

  2. Oil and Gas: The stability offered by EnviroGrid® is crucial for constructing foundations in remote or marshy locations where oil and gas infrastructure is often established.

  3. Mining: In mining operations, where accessibility can be a significant hurdle, EnviroGrid® facilitates road construction and foundation stability.

  4. Environmental Protection: EnviroGrid® aids in erosion control, providing stability to slopes and preventing environmental degradation.

How and Why EnviroGrid® Works: The Technicalities

  • Installation: EnviroGrid® is installed by laying the geocell on the prepared subgrade and infilling it with locally available materials, creating a robust foundation.

  • Strength and Durability: The interconnected cells of EnviroGrid® distribute loads efficiently, enhancing load-bearing capacity and longevity.

  • Cost-Efficiency: The use of locally available infill materials minimizes transportation costs, making EnviroGrid® a cost-effective solution.

Environmental Sustainability: Beyond Stability

EnviroGrid® not only tackles construction challenges but also aligns with sustainable practices. Its use of local materials reduces the environmental impact associated with transporting heavy construction materials to the site.

Conclusion: Transforming Construction Norms

EnviroGrid® Geocell is not just a product; it's a transformative force in construction, allowing for the realization of projects in areas once considered impractical. As industries increasingly turn to sustainable and adaptable solutions, EnviroGrid® stands as a testament to innovation that reshapes the very foundations—literally—of construction and infrastructure development.

Click for
pricing/ info

Tags: #envirogrid

The Essentials of Plastic Under a Concrete Slab

Posted by Global Plastic Sheeting on Fri, Dec 22, 2023 @ 10:22

Beneath the Surface: Unveiling the Essentials of Plastic Under a Concrete Slab

Concrete slabs serve as the foundation for countless structures, and the decision to incorporate plastic underneath is a critical consideration. In this comprehensive guide, we'll delve into the why, when, where, types, installation tips, and potential pitfalls to help contractors and homeowners make informed decisions.

Why Use Plastic Under a Concrete Slab?

  1. Moisture Mitigation: Plastic acts as a moisture barrier, preventing ground moisture from seeping into the concrete and causing issues such as mold growth and structural damage.

  2. Radon Protection: In regions prone to radon gas, plastic barriers under slabs serve as a protective layer, minimizing the potential for radon infiltration into indoor spaces.

  3. Termite Prevention: Plastic acts as a deterrent against termites, safeguarding the structural integrity of the concrete.

When and Where is it Necessary?

  1. Cold and Humid Climates: Regions with cold or humid climates benefit significantly from plastic under slabs to prevent moisture-related problems.

  2. Below-Grade Structures: Basements and crawlspaces are prime locations for plastic barriers to counteract moisture infiltration.

  3. High Water Tables: Areas with high water tables increase the risk of moisture intrusion, making plastic a valuable protective measure.

Types of Plastic for Slab Underlayment:

  1. Polyethylene (PE): A common choice due to its durability and resistance to moisture.

  2. High-Density Polyethylene (HDPE): Offers enhanced strength and durability, suitable for more demanding applications.

  3. Vapor Retarder Barriers: Include reinforced options like Griffolyn® for added strength and protection against moisture and radon.

Installation Tips:

  1. Proper Sealing: Ensure seams and edges are adequately sealed to prevent moisture penetration.

  2. Subgrade Preparation: Level and compact the subgrade before laying the plastic to minimize the risk of tears or punctures.

  3. Install on the Warm Side: Place the plastic on the warmer side of the insulation to optimize its moisture mitigation properties.

Mistakes to Avoid:

  1. Inadequate Sealing: Improper sealing can compromise the effectiveness of the plastic barrier.

  2. Incorrect Placement: Placing the plastic on the wrong side of the insulation can diminish its moisture-blocking capabilities.

  3. Ignoring Site Conditions: Failing to consider local soil and climate conditions can lead to suboptimal outcomes.

Is Plastic Under a Concrete Slab Always Necessary?

While highly beneficial in many scenarios, there are instances where plastic may not be necessary:

  1. Dry Climates: In arid regions with low moisture levels, the necessity for plastic may be reduced.

  2. Well-Ventilated Areas: Properly ventilated spaces may naturally mitigate moisture concerns without the need for additional barriers.

Frequently Asked Questions about Plastic Under A Concrete Slab

Do you need it?

It depends.

    • Climate: In dry climates with low water tables, a vapor barrier might not be necessary.
    • Soil moisture: High water table or frequent flooding increase the need for a barrier.
    • Building type: Basements and structures with conditioned spaces below the slab benefit significantly from a vapor barrier.

Types of plastics:

    • Polyethylene (Poly): Most common, affordable, available in various thicknesses (10-15 mil recommended).
    • Cross-Laminated Polyethylene (XPE): More durable and puncture-resistant than poly, ideal for high-traffic areas.
    • High-Density Polyethylene (HDPE): Very strong and puncture-resistant, but less flexible, suited for demanding projects.

Benefits:

    • Prevents moisture damage and related issues like mold and slab cracking.
    • Protects flooring materials from moisture-induced warping and delamination.
    • Extends the lifespan of your concrete slab.
    • Improves energy efficiency by minimizing moisture infiltration and enhancing insulation effectiveness.

Drawbacks:

    • Adds to the construction cost.
    • Must be installed properly to avoid leaks and moisture traps.
    • Can trap moisture under the slab in poorly ventilated areas.

Material Specifics:

    • Polyethylene vs. XPE vs. HDPE: Choose XPE for durability or HDPE for extreme strength, prioritize poly for affordability.
    • Class A, B, and C: Class A provides the best protection, B is a good balance, C is suitable for low-risk applications.
    • Thickness: 10-15 mil is standard, thicker options offer extra protection in high-moisture environments.
    • Cost: Poly is cheapest, XPE is slightly more expensive, HDPE is the most expensive.

Application and Installation:

    • Install plastic directly on the prepared subgrade before gravel or base materials.
    • Overlap rolls at least 6 inches and seal all seams and penetrations with specialized tape.
    • Ensure proper attic ventilation even with a vapor barrier.

Alternative Options:

    • Liquid-applied vapor barriers: Offer continuous protection but require professional application.
    • Breathable membranes: Allow some moisture vapor to pass through, potentially reducing the risk of moisture buildup under the barrier.

Regional Considerations:

    • Check local building codes for vapor barrier requirements in your area.
    • Consult a professional for specific recommendations based on your climate and soil conditions.

Important Note: This information is general and not a substitute for professional advice. Always consult a qualified building professional for guidance on your specific project.

Conclusion: Making Informed Choices for Durable Foundations

Incorporating plastic under a concrete slab is a proactive measure to enhance the longevity and performance of structures. Consider local conditions, climate, and intended use to determine the necessity. Selecting the right type of plastic and ensuring proper installation are crucial steps in fortifying foundations against moisture-related challenges. By understanding the why, when, and how, contractors and homeowners can make informed decisions that contribute to the lasting resilience of their concrete structures.

Click for
pricing/ info

Tags: #Plasticunderconcrere

Understanding Ceiling Vapor Barriers

Posted by Global Plastic Sheeting on Fri, Dec 22, 2023 @ 10:00

As contractors and homeowners alike strive to enhance the longevity and performance of buildings, the role of ceiling vapor barriers becomes increasingly crucial. Let's explore the why, how, and when of using ceiling vapor barriers, suggesting products for optimal results and delving into scenarios where their application may or may not be necessary.

What are Celing Vapor Barriers?

Simply put, a ceiling vapor barrier is a material installed on the warm side of your ceiling assembly (usually between the drywall and insulation) to restrict moisture movement from your living space into the colder attic or roof cavity

Why Use Ceiling Vapor Barriers?

Ceiling vapor barriers serve as a line of defense against moisture-related issues within a structure. By preventing water vapor from infiltrating the ceiling, these barriers contribute to:

  1. Mold Prevention: Moisture can lead to mold growth, which not only compromises indoor air quality but also jeopardizes the structural integrity of the building. Vapor barriers create a barrier against mold-friendly conditions.

  2. Energy Efficiency: Properly installed vapor barriers improve energy efficiency by preventing condensation within the ceiling. This, in turn, supports insulation performance, reducing the likelihood of heat loss.

  3. Structural Integrity: Over time, moisture infiltration can lead to structural damage. Ceiling vapor barriers help maintain the integrity of building materials, preventing issues like rot and decay.

When is a Ceiling Vapor Barrier Necessary?

While the necessity of a ceiling vapor barrier depends on various factors, including climate, insulation type, and building design, here are scenarios where it is often beneficial:

  1. Cold Climates: In regions with cold climates, the temperature difference between indoor and outdoor environments can lead to condensation within the ceiling. Vapor barriers become essential in preventing this condensation.

  2. High Humidity Areas: Buildings in high humidity areas are prone to moisture-related problems. Ceiling vapor barriers are effective in mitigating the impact of humidity, especially in spaces like basements and crawlspaces.

  3. Insulation Upgrades: When upgrading insulation, incorporating a ceiling vapor barrier is advisable to enhance the overall effectiveness of the insulation material.

When May it Not be Necessary?

  1. Hot, Dry Climates: In areas with hot, dry climates, the risk of condensation is minimal. In such cases, a vapor barrier may not be necessary.

  2. Adequate Ventilation: Well-ventilated spaces naturally expel moisture, reducing the need for additional vapor barriers.

  3. Specific Building Designs: Some building designs and materials naturally resist moisture, making vapor barriers less critical.

Recommended Products for Ceiling Vapor Barriers- made in the USA:

  1. Griffolyn® Type-85 FR:

    • Reinforced 5-ply laminate combining three layers of high density polyethylene and two high-strength cord grids. 
    • Suitable for various applications, providing protection against mold and structural damage.
  2. Griffolyn® Type-90 FR:

    • Reinforced fire retardant 5-ply for extreme temperature variations.
    • Delivers extra strength and extra-low permeance.
  3. Griffolyn® VaporGuard®:

    • 3-ply combining HDPE/LLDPE & aluminum for extremely low permeance.
    • Ideal for special applications such as radon protection, cold storage, museums, and computer rooms.

Installation Tips:

  1. Prepare the Surface: Ensure the ceiling framing is dry and free of debris before installing the barrier.
  2. Ensure proper sealing at seams and edges to prevent air leakage.
  3. Install the vapor barrier on the warm side of the insulation.
  4. Ventilation is Key: Even with a barrier, proper attic ventilation remains crucial for overall moisture control.
  5. Choose a vapor barrier with fire retardant properties for added safety.

In conclusion, the application of ceiling vapor barriers is a strategic step in safeguarding your building against moisture-related challenges. Consider the climate, insulation, and specific needs of the space to determine whether a vapor barrier is necessary. Choose high-quality products like Griffolyn® for reliable and durable moisture protection. With the right approach, you can enhance the longevity, efficiency, and overall performance of your building.

Click for
pricing/ info


Tags: Ceilingvaporbarriers

Vapor Barrier Plastic for Walls: A Homeowner's Guide to Moisture Protection

Posted by Global Plastic Sheeting on Thu, Dec 21, 2023 @ 03:41

Vapor Barrier Plastic for Walls:

As a homeowner, you're likely familiar with the importance of protecting your home from the elements, and one crucial aspect of this is managing moisture. Griffolyn® vapor barriers and vapor retarders offer a robust solution to prevent water vapor from causing insulation issues, structural damage, and other moisture-related problems. In this guide, we'll explore the significance of vapor barriers for walls, the quality and material considerations, and Griffolyn's high-quality product line.

Why Do You Need a Vapor Barrier on Walls?

The primary purpose of a vapor barrier is to prevent water vapor or moisture from reaching a building's ceilings, walls, or crawlspaces where it can condense, potentially causing mold growth or rot. Particularly in regions with specific climate characteristics, the installation of a vapor barrier becomes crucial to maintaining the structural integrity of your home.

Quality and Material Test Qualifications Matter!

When it comes to vapor barriers, the quality and material used play a significant role in their effectiveness. Griffolyn offers a range of high-quality string-reinforced regular and fire retardant wall vapor retarders. These products vary in thickness from a 3-ply laminate to a 7-ply laminate, ensuring durability and efficiency for different applications.

Here's a snapshot of Griffolyn's product line:

  1. Griffolyn® Type-65:

    • Reinforced high-density 3-ply.
    • General-purpose, meeting strength and permeance requirements for most applications.
  2. Griffolyn® Type-85:

    • Reinforced high-density 5-ply.
    • Greater strength and lower permeance for roofing and under slab applications.
  3. Griffolyn® Type-105:

    • Reinforced high-density 7-ply.
    • Extra strength and extra-low permeance for additional requirements.
  4. Griffolyn® VaporGuard®:

    • 3-ply.
    • Combines HDPE/LLDPE & aluminum for extremely low permeance, suitable for special applications.
  5. Griffolyn® Type-55 FR:

    • Reinforced 3-ply.
    • General-purpose fire retardant vapor retarder.
  6. Griffolyn® Type-1200 FR:

    • Reinforced 3-ply.
    • Greater strength and lower permeance, qualifying as a Class 1 building product.
  7. Griffolyn® Type-90 FR:

    • Reinforced fire retardant 5-ply.
    • Extra strength and extra-low permeance for applications with extreme temperature variation.

When is a Vapor Retarder (Vapor Barrier) Required?

Understanding when a vapor retarder is required is crucial for homeowners. In the United States, climate zones 4C, 5 through 8, typically necessitate a vapor barrier, especially if the building is clad with absorptive material. Additionally, local laws and building codes may influence the requirement. Vapor retarders benefit homes by protecting them from moisture-related issues, and various films undergo tests to determine their water vapor permeance.

Quality Testing Standards:

Griffolyn's vapor barriers adhere to rigorous testing standards to ensure their effectiveness:

  1. ASTM D 882: Tensile Properties of Thin Plastic Sheeting.
  2. ASTM D 1709: Impact Resistance of Plastic Film by the Free-Falling Dart Method.
  3. ASTM D 2582: Puncture-Propagation Tear Resistance of Plastic Film and Thin Sheeting.
  4. ASTM D 3776: Mass per Unit Area (Weight) of Woven Fabric.
  5. ASTM D 4833: Index Puncture Resistance of Geotextiles, Geomembranes, and Related Products.
  6. ASTM E 84: Surface Burning Characteristics of Building Materials.
  7. ASTM E 96: Water Vapor Transmission of Materials.
  8. NFPA 701: Fire Tests for Flame-Resistant Textiles and Films.

The International Residential Code (IRC) classifies vapor retarders into Class I, II, or III based on their permeability to water vapor. Class I has very low permeability, Class II has low permeability, and Class III has medium permeability.

In conclusion, choosing a reliable vapor barrier is essential for safeguarding your home from potential moisture-related issues. Griffolyn's high-quality products, backed by rigorous testing, make them a reliable choice for homeowners looking to enhance their home's protection against water vapor. Always check local building codes and consult with professionals to determine the specific requirements for your location. Remember, a well-protected home is a comfortable and resilient one.

Click for
pricing/ info

Tree Root Barrier Installation Guide

Posted by Global Plastic Sheeting on Wed, Dec 20, 2023 @ 03:53

Installation Guide for Root Barrier with HDPE Plastic:

Materials Needed:

  • HDPE Plastic Root Barrier
  • Digging Tools (Shovel, Trowel)
  • Measuring Tape
  • Landscape Fabric
  • Backfill Material (Gravel or Soil)
  • Heavy-Duty Staples or Anchors
  • Utility Knife
  • Gloves

Step 1: Assess and Plan

  1. Identify the type of tree and its root pattern. Different trees may require specific barrier configurations.
  2. Measure the distance from the tree trunk to the area where you want to restrict root growth.

Step 2: Choose Barrier Type

  1. For Bamboo:

    • Install a vertical barrier at least 18 inches deep around the bamboo cluster.
    • Extend the barrier 2-3 feet above the ground to prevent rhizomes from spreading.
  2. For Other Trees:

    • Install a vertical barrier at least 24 inches deep around the tree.
    • Extend the barrier in a circular pattern based on the tree's projected root spread.

Step 3: Dig Trench

  1. Use a shovel to dig a trench around the marked perimeter.
  2. For bamboo, create a barrier that goes deeper than the rhizomes.

Step 4: Install Landscape Fabric

  1. Line the trench with landscape fabric to prevent soil intrusion into the barrier.
  2. Ensure the fabric extends below and above the HDPE barrier.

Step 5: Place HDPE Plastic Barrier

  1. Unroll the HDPE plastic barrier along the trench.
  2. Position it vertically with the smooth side facing the tree or bamboo.

Step 6: Secure the Barrier

  1. Use heavy-duty staples or anchors to secure the HDPE barrier to the ground.
  2. Ensure the barrier stands upright without gaps.

Step 7: Overlap Sections

  1. If using multiple sections of HDPE barrier, overlap them by at least 12 inches.
  2. Secure the overlapping sections with additional staples or anchors.

Step 8: Cut Excess Barrier

  1. Trim the excess HDPE barrier with a utility knife.
  2. Leave the barrier at least 2 inches above the ground to account for settling.

Step 9: Backfill

  1. Fill the trench with backfill material (gravel or soil).
  2. Tamp the backfill to eliminate air pockets and provide stability.

Step 10: Monitor and Maintain

  1. Regularly monitor the barrier's effectiveness by checking for root encroachment.
  2. Adjust and reinforce the barrier if needed.

Tips:

  • Install the root barrier during the tree's dormant season.
  • Consider professional advice for specific tree species.
  • Ensure proper disposal of excess HDPE material according to local regulations.

By following these step-by-step instructions tailored to different trees, you can effectively install an HDPE root barrier to manage invasive root growth. Consult with an arborist to assure your particular success for your tree and yard.

Visit the product page for more information

Click for
pricing/ info

Tags: #DIYrootbarrier, HDPErootbarrier

Optimal Vapor Barrier for Under Concrete

Posted by Global Plastic Sheeting on Wed, Dec 20, 2023 @ 03:40

In the intricate world of construction, the importance of vapor barriers under concrete slabs cannot be overstated. Builders and contractors, let's delve into the crucial aspects of material choices, installation considerations, industry classifications, and the indispensable advantages of incorporating vapor barriers in your projects.

Material Choices for Under Concrete Slabs/ Best Moisture Barrier for Concrete Floor:

  1. Polyethylene Sheeting:

    • Advantages: Cost-effective, versatile, and readily available.
    • Considerations: Varying thicknesses (6 mil, 10 mil, etc.) for different applications.
  2. Reinforced Vapor Barriers:

    • Advantages: Enhanced durability and tear resistance.
    • Considerations: Ideal for high-traffic or challenging installation environments.
  3. Bituminous Membranes:

    • Advantages: Excellent waterproofing properties.
    • Considerations: Suitable for specific projects where moisture control is critical.
  4. Composite Vapor Barriers:

    • Advantages: Combines multiple materials for improved performance.
    • Considerations: Offers a balance between cost and effectiveness.

Area for Vapor Barrier Installation:

The vapor barrier will be installed on the subgrade, creating a protective layer between the soil and the concrete slab. The subgrade preparation is vital, ensuring a smooth surface free from debris and sharp objects that could compromise the integrity of the vapor barrier.

Industry Classifications for Under Concrete Vapor Barriers:

  1. ASTM E1745:

    • Purpose: Standard Specification for Water Vapor Retarders Used in Contact with Soil or Granular Fill under Concrete Slabs.
    • Classification: Types A, B, C, D, E, and F based on permeance and puncture resistance.
  2. ASTM D4397:

    • Purpose: Standard Specification for Polyethylene Sheeting for Construction, Industrial, and Agricultural Applications.
    • Classification: Types I, II, III, IV, and V based on material properties.

Necessity of a Vapor Barrier:

While not mandatory in all cases, using a vapor barrier under concrete slabs is highly recommended. The decision depends on factors such as climate, soil conditions, and the intended use of the structure. Vapor barriers provide a critical defense against moisture infiltration, mitigating the risk of concrete deterioration, mold growth, and potential health hazards.

Advantages of Having a Vapor Barrier:

  1. Moisture Control:

    • Prevents moisture from migrating through the slab, safeguarding against concrete degradation.
  2. Mold Prevention:

    • Creates a barrier that inhibits mold and mildew growth, promoting a healthier indoor environment.
  3. Increased Durability:

    • Extends the lifespan of the concrete by minimizing exposure to damaging moisture.
  4. Improved Indoor Air Quality:

    • Reduces the risk of indoor air quality issues associated with mold and moisture.
  5. Energy Efficiency:

    • Enhances the efficiency of insulation systems by preventing moisture-related thermal conductivity.

Remember, choosing the right vapor barrier is an investment in the longevity and health of your construction project. So, do your research, understand the options, and don't hesitate to consult with a professional at Global Plastic Sheeting (866.597.9298) if needed. 

FAQ's Regarding Vapoar Barriers Under Concrete

  1. Should I put vapor barrier under concrete?

    • Yes, it's generally recommended to install a vapor barrier under a concrete slab. This is because:

        • Prevents moisture damage: A vapor barrier blocks moisture from the ground from migrating into the concrete, which can cause various problems like:
            • Dampness and mold growth
            • Slab deterioration and cracking
            • Flooring issues (buckling, warping, peeling)
            • Corrosion of rebar (if present)
        • Protects flooring: Moisture in the slab can also damage flooring materials, especially those sensitive to humidity.
      • Extends slab life: A vapor barrier helps maintain a drier slab, potentially extending its lifespan.
  2. What is the code for vapor barrier under a concrete slab?

    • Building codes may vary, but ASTM E1745 and ASTM D4397 are common standards for vapor barriers under concrete, guiding material and installation requirements.
  3. What is the best material for under a concrete slab?

        • Polyethylene sheeting (poly): Most common and affordable option, available in various thicknesses (10-mil or 15-mil often used).
        • Cross-laminated polyethylene (XPE): More durable and puncture-resistant than standard poly.
      • High-density polyethylene (HDPE): Very strong and puncture-resistant, but less flexible.


In conclusion, the selection of the right vapor barrier is a nuanced decision, requiring careful consideration of material properties, industry standards, and project-specific needs. By understanding the options available and the advantages they offer, builders and contractors can make informed choices, ensuring the longevity and performance of concrete structures in diverse construction scenarios.

Visit the product page here

Click for
pricing/ info

Build a Backyard Legendary Slip and Slide- Here's How!

Posted by Global Plastic Sheeting on Wed, Dec 20, 2023 @ 03:22

Unleash the Fun: Secret Slip and Slide Tips for an Epic Adventure

Summer brings the promise of sun-soaked days and boundless fun, and what better way to embrace the season than with an epic slip and slide adventure? Whether you're planning a backyard bash or a neighborhood block party, here are some secret tips to elevate your slip and slide experience to legendary status.

Behind the Scenes: 5 Stealthy Tips for Crafting an Unforgettable Slip and Slide Experience!

1. Start with Heavy Duty Plastic Liners:

Invest in heavy-duty plastic liners for a smooth and durable slide. Choose liners that are both tough and slippery to ensure a thrilling ride.Talk to Global Plastic Sheeting and select the liner to suit your needs as the one seen in the video above.

Slip and Slide from Global Plastic Sheeting  866 597 9298  Get yours today!

2. Waterproof Tape for Seams:

Seal the deal with waterproof tape for seams. Reinforce connections between sections of the slip and slide to prevent leaks and ensure a continuous, slippery surface. Visit the product page here

3. Professional Material for Maximum Thrills:

Elevate your slip and slide game by working with professionals. Seek out companies that specialize in high-quality slip and slide materials to guarantee an exhilarating experience.

4. Soap It Up:

What's a slip and slide without a little extra slip? Add a touch of mild soap or a non-toxic water-based lubricant to enhance the slipperiness and maximize the thrill.

5. Perfect Your Slide Technique:

Encourage sliders to perfect their technique. A well-executed slide involves a running start, a controlled belly flop, and a big smile for the camera at the end.

6. Create Splash Zones:

Incorporate splash zones along the slide. Set up kiddie pools or shallow containers at strategic points to add an extra splash of excitement.

7. Innovative Water Delivery:

Consider using a soaker hose or misting system to keep the slide consistently wet. This ensures a continuous flow of water for optimal sliding conditions.

8. Fun Games for Added Excitement:

Infuse extra excitement with slip and slide games. Set up a target at the end for sliders to aim at, or time them for a friendly competition.

9. Choose the Right Inflatables:

Opt for inflatable pool toys or rafts that add an element of fun. Sliders can ride down with style and flair, making the experience even more memorable.

10. Safety First:

Prioritize safety by placing the slide in a clear, obstacle-free area. Ensure there's enough space for a smooth takeoff and landing.

11. Capture the Moments:

Don't forget to capture the moments! Set up a designated photo area or assign someone to capture the pure joy on the faces of sliders.

12. Post-Slide Hydration Station:

Create a hydration station nearby with refreshing drinks and snacks to replenish energy after an exhilarating slide.

In the world of slip and slides, a little planning goes a long way. With the right materials, a touch of creativity, and a sprinkle of secret tips, you're well on your way to hosting the ultimate slip and slide adventure. Get ready to slide into summer fun like never before!

Note: Ensure safety precautions, especially when using soap or lubricants, and supervise younger participants for a worry-free event.

Click for
pricing/ info


Vapor Barriers- The Do's and Don'ts!

Posted by Global Plastic Sheeting on Wed, Dec 20, 2023 @ 02:56

Navigating Vapor Barriers: A Comprehensive Guide to Dos and Don'ts

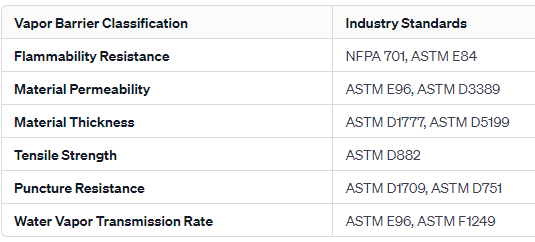
In the realm of construction and environmental protection, vapor barriers play a crucial role in maintaining structural integrity and ensuring the longevity of buildings. Understanding the dos and don'ts of vapor barriers is essential for architects, builders, and homeowners alike. In this comprehensive guide, we'll delve into the intricacies of vapor barriers, discussing best practices, standards such as NFPA 701 and ASTM E84, and pitfalls to avoid.

What is a Vapor Barrier?

A vapor barrier is a material designed to impede the transmission of water vapor, preventing moisture from infiltrating building structures. It is a critical component in controlling humidity levels and safeguarding against potential issues like mold growth and structural damage.

Dos:

1. Choose the Right Material:

Selecting an appropriate vapor barrier material is paramount. Materials that comply with industry standards such as NFPA 701 (National Fire Protection Association) and ASTM E84 (American Society for Testing and Materials) ensure safety and performance.

2. Consider Location and Climate:

Tailor the choice of vapor barrier to the specific climate and location of the building. A vapor barrier that works effectively in a humid climate may not be suitable for a drier region.

3. Proper Installation:

Ensure meticulous installation by following manufacturer guidelines. Proper sealing of seams and overlaps is crucial to the barrier's effectiveness.

4. Integrate with Building Design:

Incorporate vapor barriers seamlessly into the overall building design. Consider factors such as insulation and ventilation to create a comprehensive moisture control strategy.

5. Regular Inspections:

Periodically inspect the vapor barrier to identify any signs of damage or deterioration. Address issues promptly to maintain the barrier's integrity.

Don'ts:

1. Ignoring Standards:

Neglecting adherence to industry standards, such as NFPA 701 and ASTM E84, can compromise safety and performance. Always verify that the chosen vapor barrier meets or exceeds these standards.

2. Overlooking Permeability:

Failing to account for the permeability of the vapor barrier material can lead to moisture entrapment. Choose materials with appropriate permeability levels based on the specific application.

3. Incomplete Sealing:

Inadequate sealing of seams and overlaps can result in moisture infiltration. Thoroughly seal all joints to maintain the barrier's effectiveness.

4. Improper Storage:

Mishandling or storing vapor barrier materials inappropriately can affect their performance. Follow manufacturer guidelines for storage to prevent damage.

5. Neglecting Building Codes:

Disregarding local building codes and regulations regarding vapor barriers can result in legal and structural complications. Always ensure compliance with relevant codes.

Industry Standards: NFPA 701 and ASTM E84

1. NFPA 701:

NFPA 701 outlines standards for the flammability of textiles used in interior furnishings and draperies. Choosing a vapor barrier that complies with NFPA 701 ensures fire safety within the building envelope.

2. ASTM E84:

ASTM E84, also known as the Steiner Tunnel Test, assesses the surface burning characteristics of building materials. Vapor barriers adhering to ASTM E84 standards demonstrate their fire resistance, helping in creating safer environments.

Conclusion:

Navigating the complexities of vapor barriers requires a keen understanding of material properties, climate considerations, and adherence to industry standards. By following the dos and don'ts outlined in this guide and prioritizing compliance with standards like NFPA 701 and ASTM E84, stakeholders can ensure effective moisture control and a safer, more durable building envelope. Stay informed, choose wisely, and build with confidence.

Visit the Vapor Barrier Product Page here

Click for
pricing/ info


Tags: vapor barriers Explained

6 Mil Sheeting vs. the Sun: Can It Handle the Heat?

Posted by Global Plastic Sheeting on Fri, Dec 15, 2023 @ 10:45

Unveiling the Sun's Impact: The Lifespan of 6 Mil Plain Plastic Sheeting

Sunlight, the lifeblood of our planet, can be a harsh mistress for certain materials. One such material is 6 mil plain plastic sheeting. While it's a versatile and affordable option for various tasks, its lifespan in full sun can be surprisingly short. Let's delve into the durability of 6 mil plastic sheeting under the sun's rays, explore its diverse applications, and discover when it's time to consider alternative films.

Sun Exposure- The Lifespan of 6 mil Poly Under the Sun:

Imagine a 6 mil plastic sheet, thin and transparent, stretched across a sun-drenched construction site. The initial days might be fine, but over time, the sun's ultraviolet (UV) radiation starts to take its toll. The plastic begins to lose its strength and flexibility, becoming brittle and prone to tearing. This process, known as photodegradation, can significantly shorten the lifespan of the sheeting.

So, how long does it last? Unfortunately, there's no one-size-fits-all answer. Factors like brand quality, sun intensity, and temperature can significantly impact the lifespan. Generally, expect 6 months to a year of sun exposure before the sheeting starts to show signs of significant degradation.

Beyond the Sun: A World of Plastic Sheeting Applications

Despite its sun sensitivity, 6 mil plastic sheeting remains a popular choice for various tasks, thanks to its:

  • Affordability: Compared to thicker or UV-treated options, 6 mil sheeting is budget-friendly.
  • Versatility: It can be used for temporary shelters, drop cloths, dust protection, weed barriers, and more.
  • Transparency: It allows light to pass through, making it ideal for greenhouses and temporary windows.
  • Ease of use: It's lightweight and easy to cut, handle, and install.

However, there are situations where 6 mil sheeting simply won't cut it. Here are some cases where alternative films are recommended:

  • Long-term outdoor applications: For projects requiring more than a year of sun exposure, consider thicker sheeting (8 mil or higher) or UV-treated options.
  • High-wind environments: Flimsy 6 mil sheeting can easily rip in strong winds. Opt for reinforced sheeting with increased tear resistance.
  • Critical applications: If the sheeting's failure could cause damage or injury, choose a more durable material like reinforced plastic or tarpaulin.

UV-Treated Plastic Sheeting: The Sun-Resistant Hero

Enter the champion of sun-drenched scenarios: UV-treated plastic sheeting. This hero boasts special additives that absorb or reflect UV radiation, significantly extending its lifespan in direct sunlight. Compared to its untreated counterpart, UV-treated sheeting can last up to 5 years or even longer, depending on the specific treatment and brand.

The difference? It's all about the science. UV-treated sheeting contains chemicals that act like sunblock for the plastic. These chemicals can either absorb UV radiation and convert it into heat, or reflect it away from the material, preventing photodegradation.

When to Choose UV-Treated Sheeting:

  • Long-term outdoor projects: Protecting equipment, firewood, or outdoor furniture from the sun's wrath.
  • Greenhouse construction: Ensuring your plants thrive under controlled sunlight conditions.
  • Pool covers: Preventing algae growth and UV damage to your pool liner.
  • Temporary roofs or shelters: Providing sun protection during construction or events.

Remember: UV-treated sheeting comes at a higher price point than its untreated counterpart. However, the extended lifespan and improved durability often make it the more cost-effective choice for long-term applications.

6 mil plastic sheeting, while versatile and affordable, has its limitations in full sun. Understanding its lifespan, recognizing its applications, and knowing when to turn to alternative films like UV-treated options are key to making

Conclusion: Choosing the Right Shield for the Sun

In the realm of plastic sheeting, recognizing the impact of sunlight is paramount. While 6 mil plain plastic sheeting serves admirably in various short-term applications, for ventures requiring endurance against the sun's relentless rays, UV Treated Plastic Sheeting emerges as the superior choice. Understanding the unique demands of each project ensures you harness the full potential of plastic sheeting, shielding your endeavors from the sun's powerful influence.

Click for
pricing/ info

Resource page for Plastic Sheeting, Greenhouse Plastic, Fire Retardant Products, HDPE- LLDPE, Tapes  760 597 9298 Global plastic sheeting

Tags: Construction Material 6 mil