
Is Pouring Your Own Concrete Slab the Right DIY Project for You?
Are you ready to enhance your property with a sturdy concrete slab? Whether you're creating a foundation for a shed, patio, or driveway, pouring your own concrete slab can be a rewarding DIY project. Let's dive into the steps involved, the tools and supplies you'll need, considerations for a successful pour, different types of concrete, and the importance of protecting your new slab.
Steps Involved in Pouring a Concrete Slab:
-
Planning and Preparation: Determine the location, size, and purpose of the slab. Obtain necessary permits and check for underground utilities.
-
Site Preparation: Clear the area of vegetation and debris. Ensure the ground is level and compacted.
-
Formwork Construction: Build forms using wood or metal to contain the concrete. Consider factors like slope and drainage to prevent water pooling.
-
Reinforcement Installation: Depending on the size and intended use of the slab, reinforce it with rebar or wire mesh for added strength.
-
Mixing Concrete: Use a concrete mixer or mix manually in a wheelbarrow according to the manufacturer's instructions. Consider factors like slump and strength requirements.
-
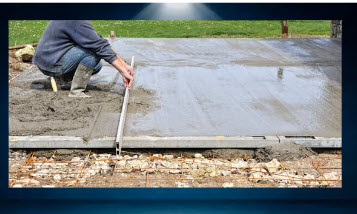
Pouring Concrete: Transfer the mixed concrete into the forms, starting from one corner and working your way to the opposite corner. Use a screed to level the surface.
-
Finishing: Smooth the surface with a bull float, then use a trowel to create a smooth, even finish. Consider adding texture or decorative patterns if desired.
-
Curing: Cover the slab with plastic sheeting or wet curing blankets to retain moisture and promote proper curing for at least 7 days.
Tools and Supplies Needed:
- Concrete mixer or mixing tools
- Wheelbarrow
- Shovel and rake
- Screed
- Bull float
- Trowel
- Reinforcement materials (rebar or wire mesh)
- Forms
- Safety gear (gloves, goggles, boots)
Considerations for a Successful Pour:
- Slope and drainage to prevent water accumulation.
- Soil type and compaction.
- Weather conditions (avoid pouring in extreme heat or cold).
- Proper reinforcement for load-bearing slabs.
- Expansion joints to prevent cracking.
Types of Concrete:
- Ready-Mix Concrete: Convenient and easy to use, suitable for most projects.
- High-Strength Concrete: Ideal for heavy-duty applications like driveways or industrial floors.
- Fiber-Reinforced Concrete: Provides added strength and crack resistance, suitable for areas prone to cracking.
Protecting Your New Slab: After pouring, it's crucial to protect the slab from damage and ensure long-term durability. Armorlon Tansguard 4000 is a high-performance concrete sealer that offers superior protection against moisture intrusion, UV damage, and chemical exposure. Its penetrating formula strengthens and seals the concrete, preventing cracking, spalling, and staining. Applied after curing, it forms a durable barrier that extends the lifespan of the slab, reducing maintenance and repair costs over time.
In conclusion, pouring a concrete slab is a manageable DIY project with careful planning and execution. By following proper procedures, selecting the right materials, and taking steps to protect the finished slab, you can create a durable and functional addition to your home that will withstand the test of time.

