Enkamat Installation Guide for Channels and Slopes
Site Preparation For Enkamat
For both slope and channel applications, the site must be shaped to the design specifications (grade, geometry, soil compaction, etc.). The area should then be dressed to be free of soil clods, clumps, roots, stumps, rocks or vehicle imprints of any significant size that would prevent the Enkamat from lying flush to surface contours.
Note: A key factor in the effectiveness of Enkamat is to maintain intimate contact with the prepared soil surface.
Enkamat Anchor Trench
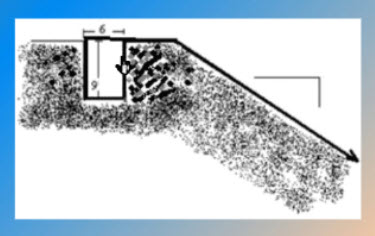
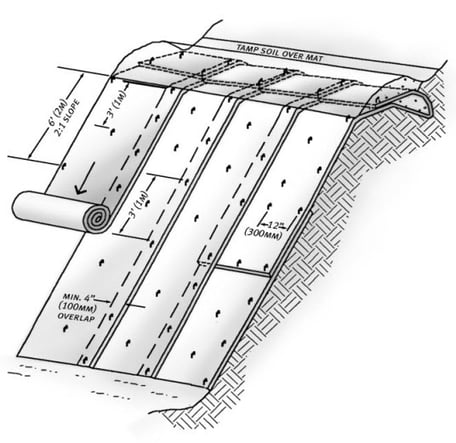
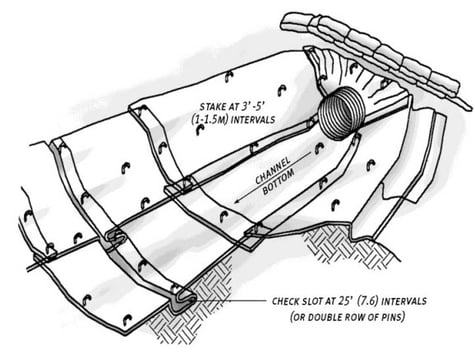
Anchor trenches are required to securely fasten the Enkamat to the ground surface and to prevent undermining from erosion beyond the protected zone. Anchor trenches are installed at least 3 feet beyond the crest of the slope in a slope application. In channel applications, the initial anchor trench is installed at the beginning of the channel (lowest elevation ) and intermediate check slots are spaced at approximately 25 -60 foot intervals upstream — depending on flow conditions and whether or not the Enkamat is soil filled. The anchor trench/intermediate check slots should be at least 6-9 inches wide and 6-9 inches deep. The Enkamat is installed into the trench and fastened at the bottom of the trench with staples/pins spaced 3 feet apart (maximum). The anchor trench/ intermediate check slots are then backfilled and compacted in a manner that does not damage the Enkamat.
EnkaTech® Note Installation Guide for Enkamat
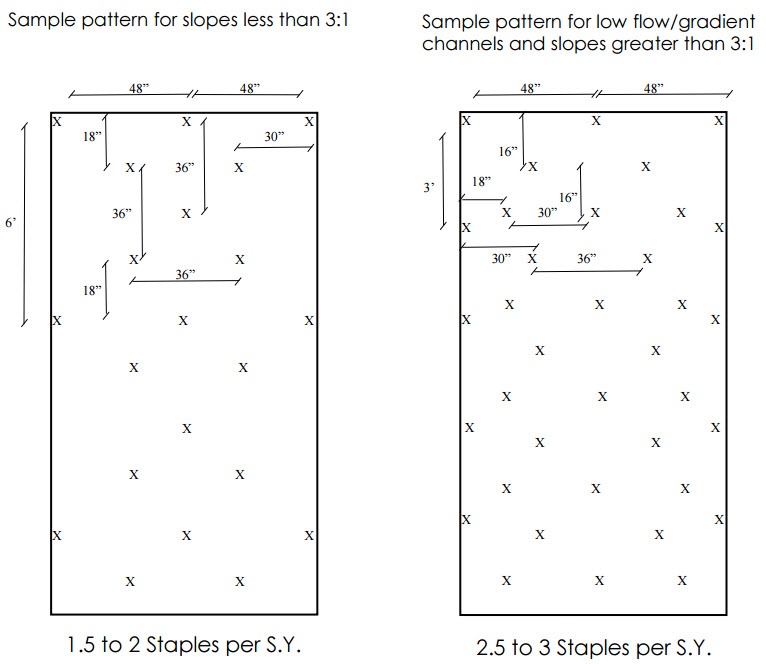
Once anchored, deploy the Enkamat by rolling down the slope or up the channel. Overlaps (edge to edge) between rolls should be 3 to 4 inches. The (end to end) splice between rolls should be 2 to 3 feet and shingled in the direction of water flow. Always securely fasten to the ground the edges of the Enkamat and overlaps with intervals of 3 feet (to 5 feet, depending on geometry of the slope or channel). Securely fasten down the center of each roll staggering center line fasteners between the outside fasteners with a spacing interval of 3 to 6 feet. Anchoring patterns will vary depending upon application, soil type, slope or channel slope, geometry, etc. Rather than try to determine the anchorage on a project-by-project basis, it has become standard practice to rely on empirically derived charts, such as Chart 1 on the next page, that relate anchor frequency to slope and channel conditions.
Slope and Channel Anchorage of TRM
Further, a general rule of thumb for estimating the amount of staples required for a project is as following:
- Slopes 1:1 to 2:1: 3-4 fasteners per square yard
- Slopes 3:1 or less: 2-3 fasteners per square yard
- High Flow Channels: 3-4 fasteners per square yard
- Low Flow Channels: 2-3 fasteners per square yard
Always install two rows of pins/staples spaced 1.5 x 1.5 feet apart at all roll splice locations. Always lay Enkamat so that contact with the soil is maintained at all times. After the Enkamat is installed, go back over the Enkamat and install additional fasteners as required to ensure the Enkamat maintains intimate contact with the soil.
Note: A detailed step-by-step installation guide is available from your Enkamat distributor or directly from Bonar at your request.
Anchoring/Fastening Devices
Wire (sod) staples (U-shaped), geotextile pins or (triangular) wooden stakes can be used as fasteners. Staples should be the type made from a minimum 11 gauge metal wire and metal pins should have a minimum diameter of 3/16” with a 1.5” steel washer at one end to form a head. Staple/pin length will vary (6”-18”) according to soil conditions but should be a minimum 6” and have a ground penetration sufficient to resist pulling out once installed. Staples/pins should be installed flush with the soil surface. If wooden stakes are used, approximately 2” of the stake should remain above ground to secure the Enkamat. In some cases, 12-30” J shaped pins are used and are made from re-bar with a minimum diameter of ¼”.
Note: It is important around any penetration through the Enkamat that additional anchorage be provided. The most common penetrations involve pipes, manholes or landscaping which the Enkamat can be easily cut to fit neatly. It is at these locations that additional anchorage will be required. These areas are notoriously prone to concentrated erosion and therefore special attention is necessary.
Seeding and Soil Filling with Enkamat
When the Enkamat is installed prior to seeding, it must be subsequently seeded and, when directed, back filled with soil. [The open physical characteristics of Enkamat facilitates soil filling.]
Seeding — Often the recommended seed mixture is seeded onto the prepared soil surface. Yet, Enkamat, with its highly open structure, can alternately accommodate seeding directly into the mat, enhancing future turf reinforcement. Every effort should be made to obtain a uniform distribution over the seeded area. If hydroseeding is used, the hydroseeder should have continuous agitation action that keeps the seed mixed in the hydromulch slurry until pumped from the tank and the pump pressure is maintained such that a continuous non-fluctuating stream is maintained. If distribution of hydroseeding is not uniform, the affected areas should be reseeded. The seed-fertilizer mixture shall be used within 4 hours of adding the seed to the tank. Except under intentional conditions, seed that is allowed to remain mixed with the fertilizer for longer than 4 hours should not be accepted for use.
Typical seed, mulch and fertilizer application rates should be obtained from the project engineer/architect and be suitable to the particular region where the project is located, native species work well with Enkamat. It should be noted that seeding during winter months might need to be repeated once climate conditions suitable for germination return in the Spring.
Soil Filling — Typically, once seeded, same day soil filling is preferred. Depending on the system design, the cover soil may be a special topsoil or simply general backfill. In either case, consideration must be made for the proper placement of the soil layer to completely fill the Enkamat without overfilling (which may prevent germination) or causing construction damage. When soil filling is recommended following seeding, a thin layer (approximately 1/2 in. - 3/4 in.) of fine soil (such as sandy loam) should be spread on top of and within the Enkamat. Blower trucks are also suitable for soil filling. The topsoil should be lightly raked (using the backside of the rake) or brushed into the mat apertures to completely fill the mat thickness. Hand implements (shovels, rakes, and brooms) are recommended for soil filling of the Enkamat. Heavy equipment traffic, sudden turning or stopping of light equipment on the newly installed Enkamat should be avoided.
Temporary protection — Soil filled Enkamat may experience erosion of the backfill when a significant rainfall event occurs. This can remove some of the protective soil from above the seed and increase the sediment yield from the protected area. If frequent and/or heavy precipitation is expected during or prior to plant germination and/or early vegetation establishment periods, then traditional mulch or an economical organic blanket can be deployed over the Enkamat to provide additional temporary protection.
Sod Cover — The Enkamat should be soil-filled with an appropriate topsoil mixture, taking care to evenly distribute the soil throughout the mat so that the mat is thoroughly covered, steel drum roller compact if possible. The sod should be placed directly on the soil-filled Enkamat and secured with appropriate sod staples or pins. This will ensure the temporary stability of the newly placed sod while root growth and reinforcement is established. [The sod will normally contain 1” to 1.5” of soil, which should result in the Enkamat at an elevation 1.2” to 1.7” below the surface. If sod contains less than 1” of soil, additional topsoil should be placed prior to sodding to provide adequate coverage]
To the best of our knowledge, the information contained herein is accurate. However, Bonar Inc. cannot assume any liability whatsoever for the accuracy or completeness thereof. Final determination of the suitability of any information or material for the use contemplated, of its manner of use and whether the suggested use infringes any patents is the sole responsibility of the user. These products may be covered by patents or patents pending.