Enka WallDrain and 3D WallDrain Installation Instructionsions
WallDrain Ventilation Mats
Materials:
Enka®WallDrain D 6P1 Plus * Enka®WallDrain D 6P1 * Enka®WallDrain D 10P1 Plus * Enka®WallDrain W 10P1 * 3DWallDrain P 10P1 Plus * 3DWallDrain P 10P1 * Cap Screws * Staples * Roofing Nails
Tools:
Measuring Tape
Utility Knife or Scissors
Hammer Tacker, Nail Gun, or Drill
General Notes:
1. These suggestions are a guide of generally accepted procedures for successful installation.
It may be followed, modified, or rejected by the contractor and/or design profession
of record or their representative since they, not Low & Bonar Inc., are responsible for
designing, planning and executing procedures appropriate to a specific application.
2. Consult local building codes and regulations prior to installation
3. Ensure that the substrate is sound and that there are no voids or other protrusions or conditions that would interfere with the systems performance.
4. Building paper or WRB should be installed with windows and doors properly flashed
and sealed according to manufacturer’s guidelines. For additional guidance refer to
ASTM E2112-07 Standard Practice for Installation of Exterior Windows, Doors and Skylights
& AAMA 2400-02 (Formerly CAWM 400-95) Standard Practice for Installation of Windows
with a Mounting Flange in Stud Frame Construction.
5. Exterior finish materials should be installed according to manufacturer’s installation
guidelines.
6. Cover rainscreen as soon as possible as it is not designed for continuous UV exposure.
7. A ventilation detail should be installed every 2 levels if structure is more than two stories.
8. In high rainfall zones a ventilation detail should be included at each level.
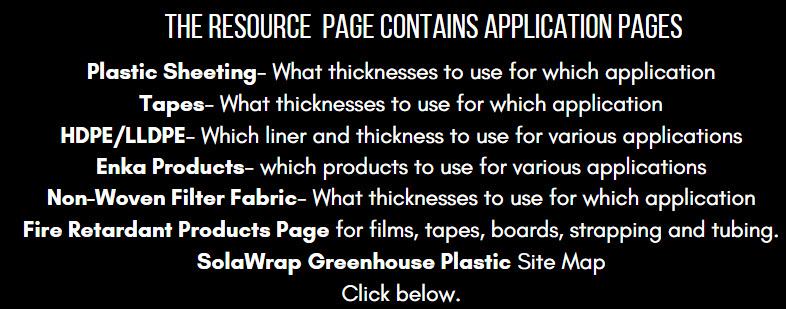
Enka WallDrain Stucco Wall Installation
1. Begin placing Enka WallDrain at the bottom of the wall with the fabric flap
down. Unroll WallDrain horizontally with entangled filaments touching the
Building Paper/WRB with the filter fabric to the outside.
2. The bottom edge of the WallDrain core should be aligned with the top
of the weep screed. Weep screed should installed according to manufacturer’s guidelines.
3. Fold the filter fabric flap around the bottom of the core and tuck between
the entangled filaments and the Building Paper/WRB. This prevents insects
from getting into the vent space.
4. Place the second horizontal row of WallDrain with the fabric flap down,
above the first row. The fabric flap will overlap the fabric of the first row.
Flap may be tacked with a staple or construction adhesive if needed to
hold in place.
5. The upper row of WallDrain can be inverted so the fabric flap is up, to
create an insect screen similar to the bottom. A separate piece of filter
fabric or window screen can be used if it is not desirable to flip the upper
row.
6. For proper performance of the ventilation system WallDrain needs to vent
at the top & bottom of the wall. The detail at the top of the wall should
prevent wind driven rain from penetrating into the WallDrain layer.
7. WallDrain should be attached with roofing nails, staples, or cap screws.
Only use enough attachments to hold in place and prevent blow off, as it
is desirable to have minimal penetrations through the WRB. Do not fasten
through flashing.
8. Attach woven wire, expanded metal, or coated fiberglass stucco reinforcement over the WallDrain according to manufacturer’s guidelines.
9. Apply scratch coat layer and manufactured stone and/or thin brick
according to manufacturer’s guidelines.

Enka WallDrain Brick Wall or Manufactured Stone Installation
1. Begin placing WallDrain at the bottom of the wall with the fabric flap
down. Unroll WallDrain horizontally with entangled filaments touching the
Building Paper/WRB with the filter fabric to the outside.
2. The bottom edge of the WallDrain core should be aligned with the top
of the weep screed. Weep screed should installed according to manufacturer’s guidelines.
3. Fold the filter fabric flap around the bottom of the core and tuck between
the entangled filaments and the Building Paper/WRB. This prevents insects
from getting into the vent space.
4. Place the second horizontal row of WallDrain with the fabric flap down,
above the first row. The fabric flap will overlap the fabric of the first row.
Flap may be tacked with a staple or construction adhesive if needed to
hold in place.
5. The upper row of WallDrain can be inverted so the fabric flap is up, to
create an insect screen similar to the bottom. A separate piece of filter
fabric or window screen can be used if it is not desirable to flip the upper
row.
6. For proper performance of the ventilation system WallDrain needs to vent
at the top & bottom of the wall. The detail at the top of the wall should
prevent wind driven rain from penetrating into the WallDrain layer.
7. WallDrain should be attached with roofing nails, staples, or cap screws.
Only use enough attachments to hold in place and prevent blow off, as it
is desirable to have minimal penetrations through the WRB. Do not fasten
through flashing.
8. Attach woven wire, expanded metal, or coated fiberglass stucco reinforcement over the WallDrain according to manufacturer’s guidelines.
9. Apply scratch coat layer and manufactured stone and/or thin brick
according to manufacturer’s guidelines.
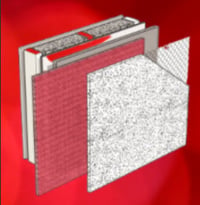
Wood Siding, Composite Wood Siding, Fiber Cement Siding, or Wood Shake Wall Installation
1. Begin placing WallDrain at the bottom of the wall with the fabric flap
down. Unroll WallDrain horizontally with entangled filaments touching
the Building Paper/WRB with the filter fabric to the outside.
2. Fold the filter fabric flap around the bottom of the core and tuck
between the entangled filaments and the Building Paper/WRB. This
prevents insects from getting into the vent space.
3. Place the second horizontal row of WallDrain with the fabric flap down,
above the first row. The fabric flap will overlap the fabric of the first row.
Flap may be tacked with a staple or construction adhesive if needed to
hold in place.
4. The upper row of WallDrain can be inverted so the fabric flap is up to
create an insect screen similar to the bottom. A separate piece of filter
fabric or window screen can be used if it is not desirable to flip the
upper row.
5. For proper performance of the ventilation system WallDrain needs to vent
at the top and bottom of the wall. The detail at the top of the wall should
prevent wind driven rain from penetrating into the WallDrain layer.
6. WallDrain should be attached with roofing nails, staples, or cap screws.
Only use enough attachments to hold in place and prevent blow off,
as it is desirable to have minimal penetrations through the WRB. Do not
fasten through flashing.
7. Install wood siding and shakes according to wood industry guidelines.
Install Composite wood and Fiber Cement siding according to manufacturer’s guidelines. Fastener lengths should accommodate the thickness of
the WallDrain. Pneumatic nailers can be used. Adjust depth gauge and
pressure to prevent over nailing and compressing the WallDrain.