Plastic Sheeting Blog. Click on Home for all our product categories...

DIY Slip and Slide - Your Homemade Backyard Waterpark!

Posted by Global Plastic Sheeting on Thu, Apr 25, 2024 @ 02:07

Dive into Summer Fun: DIY Slip and Slide with 30 Mil White HDPE

slip and slide


Introduction: As the sun starts to shine brighter and temperatures rise, it's time to embrace the joys of summer and cool off with some outdoor fun. What better way to do that than with a homemade slip and slide? In this blog post, we'll show you how to create your own slip and slide using 30 mil white HDPE (High-Density Polyethylene) and explain why this particular material is ideal for the job.

Why 30 Mil White HDPE?

Before diving into the DIY process, let's talk about why 30 mil white HDPE is the perfect choice for your slip and slide project:

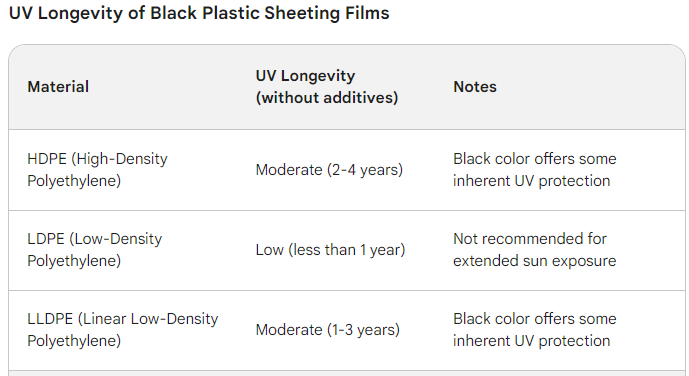
  1. UV Protection: HDPE is known for its excellent UV resistance, making it durable and long-lasting even when exposed to the sun's rays for extended periods. This means your slip and slide will stay vibrant and intact throughout the summer season.

  2. Thickness: The 30 mil thickness of the HDPE film provides added durability and strength, ensuring that your slip and slide can withstand the rigors of outdoor use without tearing or puncturing easily.

  3. Slick Surface: HDPE has a naturally slick surface, which creates the perfect glide for sliding and ensures a smooth and enjoyable experience for all participants.

Now that we've covered why 30 mil white HDPE is the preferred material for your slip and slide, let's get into the DIY process.

Materials Needed:

  • 30 mil white HDPE (available at hardware stores or online)
  • Garden hose or sprinkler
  • Tent stakes or heavy-duty staples
  • Hammer or mallet
  • Soap or dish detergent
  • Water

Instructions:

  1. Choose Your Location: Find a suitable outdoor area with a flat surface and enough space to lay out your slip and slide. Make sure there are no sharp objects or obstacles in the way.

  2. Unroll the HDPE Film: Lay out the 30 mil white HDPE on the ground, ensuring that it is flat and smooth. You can cut the film to your desired length using scissors or a utility knife.

  3. Secure the Edges: Use tent stakes or heavy-duty staples to secure the edges of the HDPE film to the ground, ensuring that it stays in place during use. Space the stakes or staples evenly along the perimeter of the slip and slide.

  4. Add Water: Turn on the garden hose or sprinkler and wet the surface of the HDPE film thoroughly. This will create a slick surface for sliding and enhance the fun factor.

  5. Apply Soap: Apply a generous amount of soap or dish detergent to the surface of the HDPE film, spreading it evenly with a sponge or brush. This will further lubricate the surface and increase the speed and smoothness of the slide.

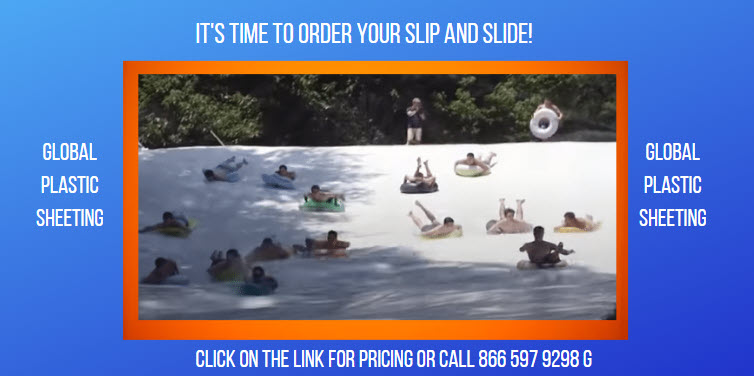
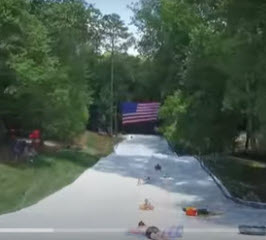
  6. Test It Out: Once everything is set up, it's time to test out your DIY slip and slide! Take a running start and dive onto the slick surface, enjoying the thrill of gliding across your backyard oasis.

  7. Keep It Wet: To maintain optimal slipperiness, periodically reapply water and soap to the surface of the slip and slide as needed. This will ensure continuous fun for hours on end.

Order your slip and slide 760 597 9298

Why a Thinner Plastic Won't Last:

When it comes to creating a durable and practical slip and slide, opting for a thinner plastic material may seem like a cost-effective choice at first glance. However, thinner plastics simply don't hold up to the rigors of outdoor use and can lead to several drawbacks that compromise the overall experience. Here's why:

  1. Tears and Rips: Thinner plastic materials are more susceptible to tears and rips, especially when subjected to repeated sliding and impact. This can quickly render the slip and slide unusable and require frequent repairs or replacements.

  2. Flimsiness: Thinner plastics lack the structural integrity and stability needed to support the weight of sliding individuals, resulting in a flimsy and unstable surface. This can lead to uneven sliding, discomfort, and potential safety hazards.

  3. Limited Durability: Thinner plastics are prone to degradation and deterioration over time, particularly when exposed to sunlight, water, and other outdoor elements. This means that your slip and slide may not last through an entire summer season, resulting in the need for frequent replacements.

  4. Poor Performance: The slickness and smoothness of the slide surface are compromised with thinner plastics, leading to subpar sliding performance and reduced enjoyment for participants. This defeats the purpose of having a slip and slide in the first place.

In contrast, opting for a thicker plastic material like 30 mil white HDPE offers numerous advantages in terms of durability, performance, and longevity. Its superior strength, UV resistance, and slick surface make it the ideal choice for creating a slip and slide that can withstand the test of time and provide endless fun for summers to come. So, when it comes to your backyard waterpark adventures, investing in quality materials is key to ensuring a splashing good time for everyone involved.

Conclusion: With just a few simple materials and some creativity, you can create your own backyard waterpark with a DIY slip and slide made from 30 mil white HDPE. Not only is this project easy and affordable, but it also provides endless entertainment for family and friends during the hot summer months. So, gather your supplies, set up your slip and slide, and get ready to make a splash this summer

Visit the Product page here

Click for pricing/ info

Tags: BackyardWaterpark, DIY Slip and Slide

Can You Stop Black Plastic Sheeting from Degrading in the Sun?

Posted by Global Plastic Sheeting on Wed, Apr 24, 2024 @ 10:13

Can You Stop Black Plastic Sheeting from Degrading in the Sun? Not Quite, But Here Are Your Options

Black plastic sheeting is a handy tool for a variety of projects, from weed control in your garden to temporary construction barriers. But there's a catch: exposure to sunlight breaks down the plastic over time. This blog dives into the reality of sun degradation and explores some alternative options depending on your project needs.

Understanding Sun Degradation:

The culprit behind plastic sheeting's demise is ultraviolet (UV) radiation from the sun. UV rays break down the plastic's molecular structure, making it brittle, cracked, and ultimately unusable. Black plastic, while offering some UV protection due to its color, still succumbs to sun damage, although typically at a slower rate than clear plastic.

So, Can You Completely Stop Degradation?

Unfortunately, there's no magic bullet to completely prevent sun degradation of black plastic sheeting. However, there are ways to slow down the process:

  • Limited Sun Exposure: Plan your project to minimize direct sunlight exposure. If possible, cover the black plastic with shade cloths or tarps when not in use.

  • Higher Quality Plastic: Opt for higher quality, UV-treated black plastic sheeting. These have additives that offer some additional protection against UV rays, extending their lifespan.

Important Note: Even UV-treated plastic will eventually degrade. The manufacturer's specifications will indicate the expected lifespan under sunlight exposure.


Choosing the Right Option:

The best solution depends on your specific project requirements:

  • Project Duration: For short-term projects, black plastic sheeting might suffice. For long-term needs, consider more durable alternatives.

  • Sun Exposure: If your project involves significant sun exposure, opt for UV-treated plastic or explore alternative materials.

  • Environmental Impact: If eco-friendliness is a concern, consider landscape fabric, mulch, or woven ground covers as they decompose naturally.

Remember, while black plastic sheeting offers a convenient solution, sun degradation is inevitable. By understanding the limitations and exploring alternative options, you can choose the best material for your project's needs and environmental impact.

Please visit the UV Resistant Plastic Sheeting Page to find multiple UV Treated Films here.

Click for pricing/ info

Enkamat 7010/7020: Installation Guide for Ventilated Roof Underlayment

Posted by Global Plastic Sheeting on Tue, Apr 23, 2024 @ 04:40

Enkamat 7010/7020: Installation Guide 

This guide provides essential steps for installing Enkamat 7010/7020, a ventilated underlayment for metal roofs. Safety First: Avoid high wind conditions during installation for optimal results.

Before You Begin:

  • Store Enkamat rolls upright in a clean, flat, protected location.
  • Ensure the roof sheathing is sound, smooth, clean, and dry with no irregularities. Acceptable sheathing materials include plywood, particle board, insulation board, and metal decking. Verify with local building codes for approved substrates.
  • Sheathing should be flat within 1/4 inch (6.4mm) over a 4-foot (1.2 m) radius, free of major dips or bumps.
  • Double-check that a weather barrier is properly installed following the manufacturer's recommendations.

Flashing and Ice Dam Protection:

  • Ensure proper flashing is installed around gutters, wall transitions, and that the roof design incorporates proper ventilation.
  • Install metal edge flashing or drip edge before applying Enkamat.
  • In harsh climates, an ice dam protection membrane is recommended at the roof's down-slope edge. Extend the membrane at least 24 inches beyond the exterior wall towards the ridge. For slopes less than 4:12, extend the membrane to 36 inches. Apply a layer of Enkamat over this membrane for ventilation.
  • Consider ice dam protection membranes for valleys, penetrations, and other roof transitions as well. A layer of Enkamat should be installed over the membrane for ventilation.
  • Always consult building codes and membrane manufacturer recommendations.

Enkamat Installation:

  • Enkamat can be installed horizontally (parallel to the ridge) or vertically (parallel to the slope). The vertical method is generally preferred for sloped roofs and can be installed as the metal roofing is applied.
  • You can choose to fully install Enkamat over the weather barrier to protect it during construction from scuffing, tearing, or other damage.
  • Lay the underlayment loosely and smooth out any wrinkles, starting at the top of the slope. For some installations, you may want to use a continuous piece from the eave to the ridge and down to the other eave. Begin the next row with the same orientation, butting it to the previous piece. Avoid overlapping.
  • Enkamat can be secured with staples, galvanized roofing nails, or cap nails. Ensure sufficient attachment to prevent the underlayment from sliding or tearing during roof installation.
  • At the ridge, the top piece should overlap a minimum of 6 inches. If using ridge ventilation for the attic space, a different detail is required (refer to ridge vent manufacturer's guide).

End Joints and Penetrations:

  • Simply butt the ends of two Enkamat pieces together. Avoid overlapping the entangled filament mats to prevent uneven thickness.
  • For penetrations like pipes, vents, or conduits, use a utility knife or scissors to carefully trim Enkamat around them, avoiding damage to the weather barrier.

Additional Details:

  • Follow the ridge vent manufacturer's instructions for proper weather barrier installation at the ridge.
  • For some rake edge details (sloped roof edge), you may need extra Enkamat to wrap over the facing and provide ventilation at the rake or other metal trim.
  • Do not leave Enkamat uncovered for more than 60 days.

By following these guidelines, you can ensure a successful installation of Enkamat 7010/7020 for a well-ventilated and protected metal roof.

Click for pricing/ info

Tags: Enkamat 7020 Installation

HDPE vs LLDPE vs LDPE- Applications

Posted by Global Plastic Sheeting on Thu, Apr 18, 2024 @ 04:27

The ABCs of Plastic Film: Demystifying HDPE, LLDPE, and LDPE

Have you ever gotten lost in the alphabet soup of plastic packaging? HDPE, LLDPE, LDPE – these cryptic codes seem to be everywhere, from grocery bags to bubble wrap. But what exactly do they mean, and why does the type of plastic film matter? This blog dives into the world of these three common plastics, clearing up misconceptions and highlighting their unique roles in society.

The HDPE, LLDPE, and LDPE Breakdown:

  • HDPE (High-Density Polyethylene): The toughest of the bunch, HDPE is known for its exceptional strength, rigidity, and chemical resistance. 

    High-density polyethylene (HDPE) isn't just about sturdy milk jugs and laundry detergent bottles. As a versatile and reliable material, HDPE takes on a crucial role in our world in the form of liners. These heavy-duty sheets act as barriers, protecting people, the environment, and valuable assets. Here's a glimpse into the important jobs HDPE liners perform:

    • Landfills and Waste Management: Large, thick HDPE liners form the foundation of modern landfills. These liners act as a crucial barrier, preventing harmful contaminants from seeping into the soil and groundwater.

    • Ponds, Lakes, and Canals: HDPE liners are used to create artificial ponds, lakes, and canals. They prevent water loss through seepage and help maintain consistent water levels.

    • Aquaculture and Fish Farming: Durable HDPE liners create strong and long-lasting ponds for fish farming, protecting the fish from contamination and ensuring clean water quality.

    • Wastewater Treatment Plants: HDPE liners play a vital role in wastewater treatment facilities, containing liquids and preventing leaks or contamination of surrounding soil and water.

    • Construction and Roofing: HDPE liners act as effective moisture barriers beneath foundations and roofs, protecting structures from water damage and promoting long-term durability.

    • Industrial Applications: HDPE liners find diverse uses in industrial settings, from lining chemical containment ponds to preventing corrosion in underground storage tanks.

    Why HDPE?

    • Strength and Durability: HDPE liners are exceptionally strong and can withstand significant wear and tear, making them ideal for long-term containment applications.

    • Chemical Resistance: HDPE is resistant to a wide range of chemicals, making it suitable for containing various liquids and protecting the environment.

    • Impermeability: HDPE liners are nearly impermeable to liquids and gases, preventing leaks and ensuring effective containment.

    • Cost-Effective: Compared to other lining materials, HDPE offers a cost-effective solution for long-lasting performance.

    Next time you see a pond, a landfill site, or even a perfectly paved road, remember the silent hero beneath the surface – the HDPE liner, working tirelessly to protect our environment and infrastructure.

  • LLDPE (Linear Low-Density Polyethylene): Offering a balance of flexibility and strength, LLDPE is known for its tear and puncture resistance. It's commonly used for things like grocery bags, bread bags, and shrink wrap.

    LLDPE Liners: Flexible Protectors for Diverse Needs

    While HDPE excels in heavy-duty containment, linear low-density polyethylene (LLDPE) plays a vital role in the world of liners, offering a unique set of benefits. These liners are all about flexibility and adaptability, making them ideal for applications requiring a more forgiving and form-fitting barrier. Here's how LLDPE liners contribute:

    • Food Grade Liners: LLDPE's flexibility and chemical resistance make it a popular choice for food-grade liners. These liners are used in food storage containers, coolers, and even some types of trash can liners for food waste.

    • Medical Waste Liners: Hospitals and healthcare facilities utilize LLDPE liners for various waste disposal needs. Their puncture resistance and ability to conform to different shapes are crucial for safe medical waste containment.

    • Pond Liners for Decorative Applications: For decorative ponds, fountains, or artificial landscapes, LLDPE liners offer a more flexible alternative to HDPE. They can conform to uneven surfaces and create natural-looking water features.

    • Pool Liners: Some above-ground and prefabricated pools utilize LLDPE liners. Their flexibility allows them to adapt to the pool's shape and withstand seasonal temperature changes.

    • Secondary Containment Liners: In industrial settings, LLDPE liners can be used as secondary containment barriers around primary tanks holding hazardous materials. Their flexibility allows them to mold around existing structures.

    • Construction and Roofing Underlayment: LLDPE sheets can act as underlayment for roofs or beneath concrete slabs. Their flexibility helps bridge minor gaps and imperfections in the sub-base, providing a more consistent surface.

    Why LLDPE?

    • Flexibility: LLDPE's key advantage is its ability to conform to irregular shapes and surfaces, making it suitable for applications where a more adaptable barrier is needed.

    • Puncture Resistance: Despite its flexibility, LLDPE offers good puncture resistance, crucial for containing sharp objects like medical waste or construction debris.

    • Cost-Effective: LLDPE liners are a cost-effective solution for applications where heavy-duty containment of HDPE isn't necessary.

    • Chemical Resistance: While not as extensive as HDPE, LLDPE offers adequate chemical resistance for various applications, including food contact.

    So, the next time you encounter a decorative pond with a natural look, a well-maintained roof, or even a specialized medical waste bin, remember the unsung hero – the LLDPE liner, providing a flexible and adaptable barrier for diverse needs.

  • LDPE (Low-Density Polyethylene): The most flexible option, LDPE is valued for its transparency and ease of sealing. It's the go-to for cling wrap, trash can liners, and some types of food packaging.

    LDPE Liners: Clingy Champions for Everyday Protection

    While HDPE and LLDPE tackle heavy-duty and flexible containment, low-density polyethylene (LDPE) steps up as the clingy champion in the world of liners. Known for its remarkable film clarity and ability to form tight seals, LDPE liners play a vital role in protecting various products and preventing leaks. Here's how LDPE liners contribute to our daily lives:

    • Food Packaging Liners: LDPE liners are widely used within food packaging, creating a barrier between food and the outer packaging. They help maintain freshness, prevent leaks, and offer clear visibility of the product.

    • Disposable Containers: Many disposable food containers, like takeout boxes and bakery containers, utilize LDPE liners. These liners prevent moisture loss, extend shelf life, and create a grease-resistant barrier.

    • Medical Instrument Pouches: Sterile medical instruments are often packaged in LDPE pouches. The clarity of LDPE allows for easy visual inspection, while the sealability ensures sterility and protects instruments from contamination.

    • Trash Can Liners for Everyday Use: LDPE is a common material for everyday trash can liners. Its affordability, clingy nature, and leak prevention make it ideal for household waste containment.

    • Drop Cloths and Dust Sheets: In construction and painting applications, LDPE sheets are used as drop cloths and dust sheets. Their ability to conform to surfaces and create a barrier protects floors and furniture from spills and dust.

    • Temporary Covers and Protection: LDPE sheets can be used for temporary covers over furniture, equipment, or unfinished work areas. Their clarity allows for light transmission while providing dust and moisture protection.

    Why LDPE?

    • Clarity: LDPE offers exceptional clarity, allowing for visual inspection of contents without compromising the barrier.

    • Cling Sealability: LDPE forms tight seals around objects and containers, preventing leaks and ensuring secure containment.

    • Moisture Resistance: LDPE acts as a moisture barrier, protecting contents from humidity and preventing spoilage or damage.

    • Cost-Effective: LDPE is an affordable option for various liner applications where heavy-duty containment isn't required.

    • Versatility: The combination of clarity, clinginess, and moisture resistance makes LDPE a versatile material for diverse lining needs.

    From keeping your lunch fresh to protecting your floors during a painting project, LDPE liners play a surprisingly significant role in our daily lives. Their affordability, clarity, and ability to form secure seals make them the clingy champions of everyday protection.

Clearing Up Common Misconceptions:

  • Myth: All plastics are bad for the environment. While plastic waste is a concern, these plastics can be recycled when disposed of properly. Responsible production and responsible recycling are key.

  • Myth: All plastics are created equal. Each type has its own strengths and weaknesses, making them suitable for specific applications.

  • Myth: Biodegradable plastics are always the best option. While biodegradable options are being developed, it's important to consider their biodegradation time and suitability for the application.

The Vital Roles of HDPE, LLDPE, and LDPE:

  • HDPE: Ensures the safe and secure transport of various liquids and chemicals. Its durability makes it ideal for long-lasting products like pipes and outdoor furniture.

  • LLDPE: Protects food and other goods from contamination and damage during transport and storage. Its versatility makes it a popular choice for flexible packaging solutions.

  • LDPE: Keeps food fresh and allows for easy viewing of contents. Its clingy nature makes it perfect for food wrap and other sealing applications.

Choosing the Right Plastic Film:

The choice between HDPE, LLDPE, and LDPE depends on the specific needs of the application. Consider factors like:

  • Strength and Rigidity: HDPE for heavy-duty applications, LLDPE for a balance, LDPE for flexibility.
  • Transparency: LDPE offers the clearest view, while HDPE can be translucent or opaque.
  • Chemical Resistance: HDPE is ideal for harsh chemicals, while LLDPE and LDPE offer varying levels of resistance.

By understanding the differences between HDPE, LLDPE, and LDPE, we can make informed choices about the plastic films we use. Responsible plastic production, responsible recycling, and choosing the right plastic for the job are all crucial steps towards a more sustainable future.

Click for pricing/ info

15 mil Fire Retardant, String-Reinforced Plastic Sheeting Barrier Uses

Posted by Global Plastic Sheeting on Thu, Apr 18, 2024 @ 02:17

15 Mil Fire Retardant, String Reinforced Vapor Barrier: A Tough Protector for Your Projects

Building projects require careful consideration of various factors, including fire safety and moisture control. A 15 mil fire retardant, string-reinforced vapor barrier offers a powerful solution for both. This blog dives into this versatile material, exploring its applications and the benefits it brings to your projects.

What is a 15 Mil Fire Retardant, String-Reinforced Vapor Barrier?

Imagine a heavy-duty plastic sheet, typically 15 millimeters (or 0.015 inches) thick. This isn't your ordinary plastic; it's a fire-retardant vapor barrier with a secret weapon – string reinforcement. This internal mesh of strong threads enhances the barrier's tear and puncture resistance.

Why Use a Fire Retardant, String-Reinforced Vapor Barrier?

This unique combination of features – fire resistance and enhanced strength – makes the 15 mil barrier ideal for various construction applications:

1. Behind Wall and Ceiling Cladding (Fire Blocking): Installed behind materials like drywall or paneling, it creates a fire barrier that can slow the spread of flames within a building, buying precious time for evacuation and fire control.

Example: Fire blocking behind drywall in residential homes, apartment buildings, or commercial spaces.

2. Under Slab Applications (Moisture and Radon Control): Laid beneath concrete slabs in basements or crawlspaces, it acts as a moisture barrier, preventing ground moisture from entering the living space. In some cases, it can also help control radon gas migration.

Example: Moisture barrier under a concrete slab in a basement home theater or a crawl space beneath a cabin.

3. Roof Decking (Moisture Protection): Placed beneath roof decking materials like plywood or oriented strand board (OSB), it protects the roof structure from moisture infiltration caused by rain or snowmelt.

Example: Moisture barrier under roof sheathing on a new home construction project or a shed addition.

4. Behind Brick Veneer (Moisture Control): Installed behind a layer of brick veneer on an exterior wall, it prevents moisture from penetrating the building envelope and damaging the interior structure.

Example: Moisture barrier behind a decorative brick facade on a commercial building or a residential fireplace surround.

5. Around Plumbing Pipes (Moisture and Condensation Control): Wrapped around pipes running through unconditioned spaces, it helps prevent condensation and potential corrosion issues.

Example: Moisture barrier around exposed plumbing pipes in a crawlspace or a basement.

6. Around HVAC Ducts (Moisture and Airflow Control): Wrapped around HVAC ductwork, it minimizes moisture transmission and leakage, promoting energy-efficient heating and cooling.

Example: Moisture and air barrier around HVAC ducts in an attic or a mechanical room.

7. Temporary Wall and Ceiling Enclosures (Construction Protection): During construction, it can be used to create temporary weatherproof enclosures for walls and ceilings, protecting building materials and ongoing work from the elements.

Example: Temporary weather barrier for a new home under construction during rainy season.

8. Behind Appliances (Moisture and Heat Control): Installed behind appliances like dishwashers or refrigerators, it can help manage moisture and some radiant heat, protecting walls from potential damage.

Example: Moisture barrier behind a dishwasher in a newly remodeled kitchen.

9. Greenhouse Vapor Control (Moisture Management): Strategic placement within a greenhouse helps manage humidity levels and create a more controlled environment for plants.

Example: Interior vapor barrier in a greenhouse to control humidity for orchids or other moisture-sensitive plants.

10. Emergency Shelter and Tarpaulin Applications: Due to its strength and fire-retardant properties, it can be used for temporary emergency shelters or as a heavy-duty tarpaulin in specific situations.

Example: Temporary fire-resistant shelter during a disaster relief operation.

The 15 mil fire retardant, string-reinforced vapor barrier offers a unique combination of strength, moisture control, and fire resistance. By understanding its various applications, you can leverage this versatile material to enhance the safety, durability, and overall performance of your construction projects.

Visit the 12 Mil FR String Reinforced Page here

Click for pricing/ info

Tags: 12 mil FR String Reinforced Film

Protecting Newly Poured Concrete

Posted by Global Plastic Sheeting on Wed, Apr 17, 2024 @ 03:16

Protecting Your Newly Poured Concrete: A Guide to Armorlon Transguard 4000

So, you've just poured some fresh concrete, huh? Congrats! But hold up – before you start celebrating, there's something you need to know: that concrete needs protection. Yep, just like how you'd protect your phone with a sturdy case, newly poured concrete requires safeguarding too. Why, you ask? Well, imagine this: your concrete is like a delicate baby bird, vulnerable to the harsh elements and potential damage during its crucial early stages of development.

Curing Concrete: The Key to a Strong and Durable Slab

You've poured your concrete slab – the foundation for your patio, driveway, or even a building. The hard work seems done, but there's one crucial step remaining: curing. Curing allows the concrete to properly hydrate and develop its full strength. Here's a deep dive into how to effectively cure your freshly poured concrete slab:

The Importance of Curing:

Concrete hardens through a chemical reaction between cement and water. This process, called hydration, continues for several days after the initial pour. However, if the concrete dries out too quickly, the hydration process is disrupted. This leads to:

  • Lower Strength: Incomplete hydration results in a weaker slab, more susceptible to cracking and wear.
  • Increased Cracking: Rapid drying creates uneven shrinkage, leading to cracks that can compromise the integrity of the slab.
  • Increased Porosity: Rapid drying can leave microscopic air pockets in the concrete, making it more porous and susceptible to water damage and deterioration.

Methods for Curing Concrete:

There are two main methods for curing concrete:

  1. Water Curing: This traditional method involves keeping the surface of the concrete moist throughout the curing period. Here's how to do it effectively:

    • Start Immediately: Begin water curing as soon as possible after the concrete has finished setting, typically within a few hours after pouring.
    • Apply Water Regularly: The goal is to maintain a continuously moist surface. Frequent sprinkling with a hose or fine misting is ideal. Aim for at least 5-7 applications of water daily, especially during hot and windy conditions.
    • Covering with Burlap: To minimize water evaporation, wet burlap sacks can be placed directly on the concrete surface. Keep them damp by periodically wetting them. Burlap provides an additional benefit by helping to regulate the drying process.
  2. Curing Compounds: These are liquid chemical formulations applied to the concrete surface after it has set. They form a membrane that prevents moisture evaporation while allowing for continued hydration within the concrete.

    • Types of Curing Compounds: There are various types of curing compounds available, each with its own application process and benefits. Some common options include:

      • Water-based: Easy to apply and environmentally friendly, but may require reapplication depending on weather conditions.
      • Solvent-based: Form a more durable film but may have a stronger odor.
      • Membranes: These are pre-formed sheets applied to the concrete surface. They are a good option for large slabs or projects where consistent water application is difficult.
    • Applying Curing Compounds: Follow the manufacturer's instructions for the specific product you're using. Generally, curing compounds are applied with a sprayer or roller to a clean and dry concrete surface.

Curing Duration:

The recommended curing duration depends on several factors, including weather conditions, concrete mix design, and desired strength. As a general rule, concrete should be cured for a minimum of 7 days, with longer curing periods beneficial in cooler or more humid climates.

Additional Tips:

  • Avoid Traffic: Limit foot traffic or construction activities on the newly poured concrete during the curing period. This minimizes stress on the curing concrete.
  • Protect from Elements: During hot weather, consider covering the slab with shade cloths or wet curing materials to minimize sun exposure and water evaporation. In cold weather, protect the slab from freezing temperatures that can disrupt hydration.

By following these guidelines and choosing the appropriate curing method, you ensure your concrete slab reaches its full potential for strength, durability, and longevity.

Enter Armorlon Transguard 4000 – your concrete's new best friend.

Picture it as a trusty shield, standing guard and keeping your concrete safe from harm. Made of natural-colored polypropylene non-woven fabric with a white polyethylene backing, this stuff is like a superhero cape for your concrete. It's got UV stabilizers to ward off the sun's rays, ensuring your concrete doesn't end up looking like a dried-out desert lizard.

And the best part? It's reusable! Yep, you heard that right – you can protect your concrete now and reuse

Transguard 4000 for future projects. Talk about bang for your buck! Plus, it's weatherproof and can handle light traffic, so you can rest easy knowing your concrete is in good hands (or should I say, good cover?).

So, whether you're tackling a massive flatwork project or building a bridge deck to somewhere exciting, Armorlon Transguard 4000 has got your back – literally. Don't leave your concrete hanging out to dry (literally) – give it the protection it deserves with Transguard 4000, and watch it thrive into a sturdy, long-lasting masterpiece.

Visit the Armorlon Transguard 4000 Product Page Here

Click for pricing/ info

Tags: Concrete Protection Armorlon Transguard 4000

Geotextiles: Beyond Landscaping Fabric

Posted by Global Plastic Sheeting on Wed, Apr 17, 2024 @ 02:58

The Unsung Hero of Construction: Unveiling the Secrets of Geotextiles

Enka-Tex N nonwoven geotextiles-jpg-1

Geotextiles might not be the most glamorous construction material, but they play a vital role in ensuring the stability and longevity of countless projects. These versatile fabrics are more than just fancy landscaping fabric; they're engineered textiles designed to perform specific functions in the ground.

So, what exactly is a geotextile?

Imagine a heavy-duty fabric sheet, typically crafted from polypropylene or polyester. Geotextiles come in various thicknesses and permeabilities, allowing them to be tailored for different applications.

Why Use Geotextiles?

These workhorse fabrics offer a multitude of benefits:

  • Separation: Geotextiles prevent the intermixing of dissimilar materials like soil and gravel. This is crucial in roads and foundations, preventing the subgrade (underlying soil) from weakening the pavement layers above.
  • Filtration: Geotextiles allow water to pass through while filtering out soil particles. This prevents clogging of drainage systems and protects valuable infrastructure from water damage.
  • Reinforcement: Geotextiles can act as a reinforcing layer, distributing stress and loads more evenly across the soil. This improves the overall stability of slopes, retaining walls, and embankments.
  • Protection: Geotextiles act as a barrier, protecting underlying structures from punctures or erosion caused by rocks or sharp objects in the soil.

Where to Find Geotextiles? These versatile materials have a wide range of applications in construction projects:

  • Roads and Pavements: Separation, filtration, and reinforcement for a strong and durable road base.
  • Drainage Systems: Filtration of soil particles to prevent clogging in drains and channels.
  • Landscaping and Erosion Control: Separation of layers, filtration for proper drainage, and soil reinforcement on slopes.
  • Retaining Walls: Reinforcement and filtration for added stability behind retaining walls.
  • Landfills: Separation of waste layers and liner protection from punctures.

Beyond the Ordinary: Unusual Applications of Geotextiles

Geotextiles aren't limited to traditional construction projects. Here are some unexpected uses:

  • Saltwater Intrusion Barriers: Filtration and separation in coastal areas to prevent saltwater from contaminating freshwater supplies.
  • Underground Utility Protection: Protection for pipes and cables from surrounding soil and potential damage during construction.
  • Lining for Artificial Ponds: Separation and filtration for a long-lasting and functional pond.

Geotextile Separation: A Closer Look

Geotextile separation is a fundamental application in construction. By preventing the intermixing of soil and other materials, geotextiles maintain the integrity of each layer. This leads to a stronger foundation, improved drainage, and ultimately, a longer lifespan for the entire project.

Thinking Outside the Box: Geotextiles and Unexpected Solutions

As you've seen, geotextiles are more than just a separation layer. Their versatility opens doors for innovative solutions in various construction and environmental applications. So, the next time you see a construction project, remember the silent hero beneath the surface – the geotextile, ensuring stability and longevity for years to come.

Please visit the Geotextile Product Page here

Click for pricing/ info


Tags: Geotextiles Uses

Grain Storage Cover Essentials: Choosing the Best Protection

Posted by Global Plastic Sheeting on Wed, Apr 17, 2024 @ 02:55

Preserving Harvests: A Guide to Grain Storage Covers

Grain storage is a critical aspect of agricultural operations, ensuring the preservation of harvests and the maintenance of quality over time. Central to this process are grain storage covers, which shield crops from the elements and preserve their integrity. In this blog, we'll explore the importance of grain storage covers and what to consider when selecting plastic sheeting for this purpose.

Importance of Grain Storage Covers:

Grain storage covers serve as protective barriers, shielding crops from moisture, pests, and adverse weather conditions. By creating a controlled environment, these covers help maintain the quality and nutritional value of grains, ensuring they remain viable for consumption or sale.

What to Look for in Plastic Sheeting:

  1. Material Quality: Opt for plastic sheeting made from high-quality materials such as polyethylene, which offers durability and resistance to tearing and puncturing. Look for UV-resistant formulations to prevent degradation from prolonged exposure to sunlight.

  2. Thickness and Strength: Consider the thickness and strength of the plastic sheeting, as it directly impacts its ability to withstand environmental stressors. Thicker sheets offer greater durability and protection, especially in regions prone to high winds or heavy snow loads.

  3. Waterproofing Properties: Choose plastic sheeting with excellent waterproofing properties to prevent moisture infiltration, which can lead to mold growth and grain spoilage. Look for covers with reinforced seams and welded edges for enhanced water resistance.

  4. UV Protection: UV radiation can accelerate the degradation of plastic sheeting over time. Select covers with UV inhibitors or additives that extend their lifespan and maintain their structural integrity, even under prolonged exposure to sunlight.

  5. Customization Options: Consider whether the plastic sheeting can be customized to fit your specific storage requirements. Look for covers available in various sizes and configurations to accommodate different grain storage setups, from silos to flat storage piles.

  6. Ease of Installation and Removal: Choose grain storage covers that are easy to install and remove, facilitating efficient grain management operations. Look for covers with built-in handles, grommets, or other features that simplify handling and securing.

  7. Regulatory Compliance: Ensure that the plastic sheeting meets regulatory standards and requirements for grain storage, particularly regarding food safety and environmental regulations. Look for certifications or compliance statements from reputable manufacturers.

Conclusion:

Grain storage covers play a vital role in safeguarding harvests and preserving grain quality. When selecting plastic sheeting for this purpose, prioritize factors such as material quality, thickness, waterproofing properties, UV protection, customization options, ease of installation, and regulatory compliance. By investing in high-quality grain storage covers, farmers can effectively protect their crops and maximize their yields.

Visit the Grain Storage Product Page Here

Click for pricing/ info

Tags: Grain Storage

ISO-Compliant Clean Room Bags Explained

Posted by Global Plastic Sheeting on Tue, Apr 16, 2024 @ 03:50

Understanding Clean Room Bags: Ensuring Contamination-Free Environments

In industries demanding pristine conditions, Clean Room Bags play a pivotal role in maintaining cleanliness standards. Let's delve into what Clean Room Bags are, their significance, and how they adhere to ISO 14644-1 standards.

What are Clean Room Bags?

Clean Room Bags are designed for environments free from dust and contaminants, crucial in industries requiring stringent cleanliness standards to prevent cross-contamination. They facilitate the transportation of items into and out of clean rooms while preserving their cleanliness.

Key Features of Clean Room Bags:

  1. Cleanliness Classification: Clean Room Bags are classified based on the number of particles found per square 0.1m. This classification is determined using a particle counter and must adhere to ISO 14644-1 and FED STD 209E standards in the U.S.

  2. Compliance with ISO Standards: Clean Room Bags and tubing must meet performance parameters outlined in ISO 14644-1 for specific clean room classes. For example, they may meet the requirements for an ISO Class 5 clean room, ensuring a maximum number of particles per square 0.1m.

  3. Material Composition: Clean Room Bags are typically made from 100% virgin Low-Density Polyethylene, ensuring they contain no additives that could contribute to contamination. They are manufactured to prevent the introduction of foreign particles during production and packaging processes.

Applications of Clean Room Bags:

  • Medical and Dental Devices: Used in operating rooms to maintain sterility and prevent contamination of medical instruments and devices.
  • Garments: Protects garments such as gloves, surgical caps, and shoe covers from contamination during storage and transportation.
  • Electronic Components: Safeguards sensitive electronic components like circuit boards and sound cards from dust and debris that could compromise their functionality.

Packaging and Certification:

  • Clean Room Bags are packaged in double poly-lined cases to ensure additional protection against contamination during storage and handling.
  • Tubing is packaged on 3” cores and also enclosed in double poly-lined cases.
  • Certification documents confirming compliance with ISO standards are available upon request, providing assurance of product quality and adherence to cleanliness standards.

In conclusion, Clean Room Bags are essential components in industries requiring pristine environments to prevent contamination and ensure product integrity. By meeting stringent ISO standards and offering reliable protection against foreign particles, they contribute to maintaining the highest standards of cleanliness in manufacturing and packaging processes.

Visit the Clean Room Bags Product Page Here

Tags: Clean Room Bags

FAR 25.853- Airplane Fire Safety

Posted by Global Plastic Sheeting on Tue, Apr 16, 2024 @ 12:39

Keeping Passengers Safe: Understanding FAR 25.853 in Airplane Interiors

Have you ever stopped to think about the fire safety measures in place within an airplane? Every detail, from the seat cushions to the overhead compartments, is meticulously regulated to ensure the highest level of passenger safety. Today, we'll delve into one such regulation: FAR 25.853.

What is FAR 25.853?

FAR 25.853 is a Federal Aviation Regulation (FAR) established by the Federal Aviation Administration (FAA) in the United States. This regulation focuses on the flammability standards for materials used in aircraft cabin and cargo compartments. In simpler terms, it dictates how easily these materials can catch fire and how they behave if a fire does occur.

Why is FAR 25.853 Important?

Imagine a scenario where a small fire breaks out on an airplane. FAR 25.853 helps prevent that minor incident from escalating into a catastrophic event. By ensuring cabin and cargo materials are flame retardant or slow the spread of flames, passengers and crew have precious time to react and evacuate safely.

What Does FAR 25.853 Regulate?

The regulation applies to a wide range of materials used in the airplane interior, including:

  • Seat cushions and upholstery
  • Wall and ceiling panels
  • Flooring materials
  • Cargo compartment liners
  • Overhead bin materials

Meeting the Standards

Materials used in aircraft interiors must undergo rigorous testing to ensure they comply with FAR 25.853. These tests measure factors like ignition resistance, flame spread rate, and heat release. Materials that meet or exceed the established standards are then deemed suitable for use in airplane cabins and cargo compartments.

Beyond FAR 25.853

While FAR 25.853 is a crucial regulation, it's just one piece of the puzzle. Airplane manufacturers and airlines implement additional safety measures to further enhance fire safety. These include:

  • Smoke detectors and fire alarm systems
  • Onboard fire extinguishers
  • Fire-resistant barriers between compartments
  • Stringent crew training on fire emergency procedures

The Bottom Line

FAR 25.853 plays a vital role in ensuring the fire safety of airplane passengers and crew. By regulating the flammability of cabin and cargo materials, this regulation helps prevent small incidents from turning into major disasters. So, the next time you board a plane, take a moment to appreciate the extensive safety measures in place, including the unseen regulations like FAR 25.853, that contribute to a safe and comfortable flying experience.

Visit the Product page to learn more

Click for pricing/ info

Tags: FAR 25.853